Denon UCD-70 CD slot does not open
- repair instructions -
The problem
The DENON UDRA-70 from the early 1990s is still in operation. Despite the "inbuild quality" of this stereo stack, fatigue phenomena in the moving parts are unavoidable. A typically error occurring after this time when opening the CD carriage is almost always due to an aged drive rubber ring (belt you would not want to call the tiny part). This spare part is still available for some money today. Because of this trifle, the device does not need to be disposed of. The replacement of the rubber ring goes with this manual in about 15 minutes. Before replacing, remove the device from the stack, disconnect all system cables and remove dust from the top. Then place in a dust-free environment on a rubber or cork plate. The front panel is scratch sensitive!
Note!
The following description is directed to persons instructed and experienced in electrical engineering. Carelessness and improper handling of the CD player can cause worser defects and endangers the user of the mistreated device. The intervention in the device happens of course at your own risk.
1. Remove the housing cover
Unscrew 5 black Phillips screws, 1 small at the back, and set aside. Spread the lid sideways slightly and pull it backwards / forwards.
2. Remove the CD carriage
Inside, the movement mechanism of the CD carriage is mounted on a plate made of sheet metal. Of the two motors, the motor on the right drives the feed of the carriage. Although it initially looks like this, the drive ring can not be removed directly because the carriage is running directly over the drive pulleys and the gap for the ring is too small. For replacement, however, only the CD carriage must be moved forward. Do not remove the front panel! The following picture shows exactly how it works:
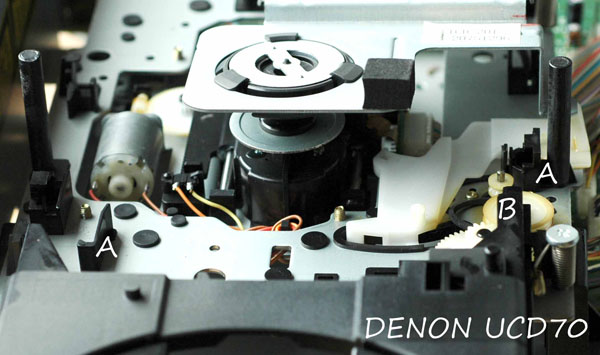
The CD carriage can be gently and slowly pushed forward by hand. At the two rear ends of the carriage cams are formed, which strike in the end position on the restraints (marked with A in the photo). Carefully press these retractors towards the center of the device and at the same time gently pull the CD carriage outwards. As soon as the (difficult-to-find) retainer on the right frees (press this very carefully), the slide can be further pulled out. The position of the carriage in the photo is sufficient to reach the two white plastic discs (marked "B"). The drive rubber can now be removed upwards.
3. Exchange the drive ring
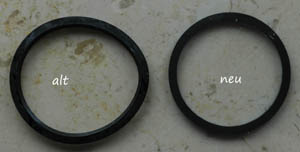
Before installing the replacement ring, the splines of the drive pulleys should be thoroughly cleaned with alcohol and Q-Tip. The following figure shows on the left side the old original drive ring modified in shape and size. The new one on the right side has an outside diameter of 20.5 mm (inside 17.7 mm) and is about 1.2 mm high. He sits much firmer and has enough friction to move the shaft clean.
After replacing the drive rubber, the shaft can be pushed back again (the cams engage with a click on the retainers) and the cover can screwed on again.